


Contour lines plugin — OsmAnd
3.840.00 Reviews
App Specs
- Version
- Varies with Device
- Updated On
- License
- $38.99
- Downloads
- 100,000+
- Developer
- OsmAnd
- Categories
- Travel & Local
- Platform
- Android
Screenshots
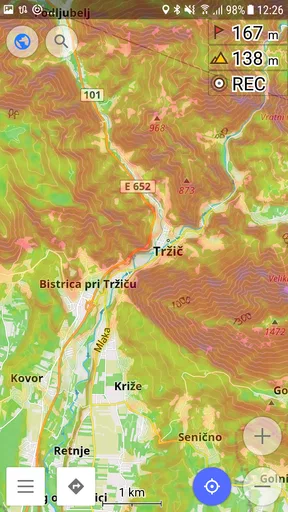
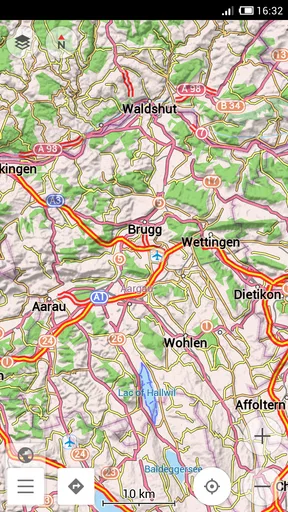
 Analysis by AppCompare
I tested the Contour lines plugin for OsmAnd as a focused add-on for outdoor map reading rather than as a complete navigation app by itself. Its purpose is straightforward: it adds terrain information to OsmAnd Maps through contour lines and hillshade, using elevation sources such as SRTM, ASTER, and NASA. That sounds narrow, and it is, but the difference becomes meaningful when a normal road map stops telling you why a route feels difficult.
For hikers, cyclists, trail planners, and anyone who needs to understand slopes before leaving home, this plugin can turn a flat-looking map into something much easier to interpret. I found its value strongest when I was comparing possible paths, checking whether a shortcut crossed a ridge, or trying to understand the shape of land around a destination. It is less compelling if you only need turn-by-turn driving directions or a simple city map.
What this OsmAnd add-on actually changes
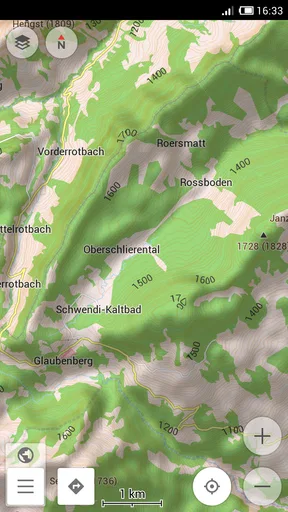
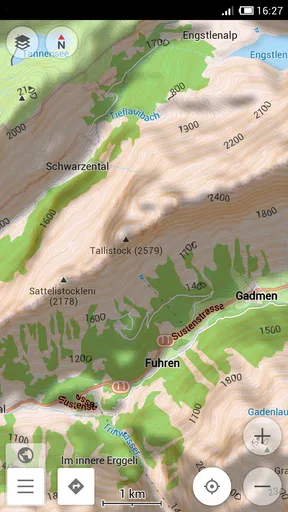
The central idea is the addition of contour lines: drawn lines that connect points with similar elevation. When those lines sit close together, the terrain is generally steeper; when they spread apart, the ground tends to rise or fall more gradually. Hillshade adds a visual layer that imitates light and shadow across the landscape, making ridges, valleys, and slopes easier to recognize at a glance.
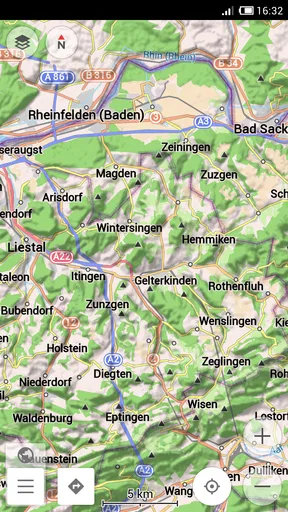
That combination is more useful than either layer alone. Contours provide a more analytical view, while hillshade gives me an immediate sense of the terrain’s shape. I can glance at a map and notice that a supposedly short path climbs sharply, or that a route follows a valley instead of crossing a high point. The plugin does not replace judgment, but it gives the map a physical dimension that ordinary street data lacks.
It is developed by OsmAnd and belongs to the Travel & Local category. The app listing describes it as a contour-lines plugin, which is an accurate description of its narrow role. I would not install it expecting a separate mapping experience with its own independent navigation system. Its usefulness depends on already using OsmAnd Maps and wanting more detailed terrain context inside that environment.
Why terrain detail builds or weakens trust
Terrain information deserves a little more caution than a simple visual decoration. A line on a screen can influence whether I choose a route, pack enough water, or assume a climb will be manageable. I therefore treat the plugin as a planning aid, not as proof that a trail is safe, open, maintained, or suitable for my ability.
The use of SRTM, ASTER, and NASA elevation sources gives the feature a clear technical foundation, but the practical result still depends on the quality and resolution of the underlying elevation data in a particular area. A map can show the broad shape of a hill without revealing every small embankment, rock step, drainage channel, or trail condition. That distinction matters especially on foot, where a minor obstacle can be more important than a broad elevation pattern.
Worth Reading Before You Choose

EA SPORTS FC Mobile 26 Is a Bigger Football Game, but It Takes Time

Flipboard Shows What News Apps Must Do Beyond the Feed

Switching to Android Auto Means Rethinking Your Driving Routine

Google Calendar Makes a Crowded Week Easier to Manage

Ludo King Makes the Most of the Minutes Between Plans

Baby Panda World Brings Quick Play to Modern Phones, but Its Game Library Feels Busy
I also pay attention to how much confidence I place in visual styling. Hillshade can make a landscape look dramatic and intuitive, yet shadows are an interpretation of terrain rather than a live observation. I use the lines to check the pattern and avoid making decisions from shading alone. When the two layers seem difficult to read together, reducing visual clutter is more valuable than leaving every available overlay visible.
Practical setup for a readable map
My preferred workflow is to begin with the map at a broad scale, identify the major ridges and valleys, and then zoom toward the route I am considering. At a wide view, too many contour lines can become a dense web. At a closer view, their spacing becomes much easier to interpret. This simple change in zoom is one of the most important ways to get useful information from the plugin.
I also compare the terrain layer with the actual route line instead of viewing it separately. A path that looks direct may cross several tightly packed contour bands. Another path may be longer but follow a gentler slope. For cycling, this can help me avoid an unpleasant climb; for walking, it can reveal why a route that looks short on distance may take considerably more effort.
A useful planning habit is to inspect both the approach and the destination. It is easy to focus on the main climb and forget that the final section may descend into a valley or rise again toward a viewpoint. Looking at the entire route in stages helps me spot repeated elevation changes rather than judging the trip from its most obvious landmark.
When I am preparing for an outing, I would take screenshots or notes of key terrain decisions rather than relying on memory. The plugin is most helpful before departure, when I can compare alternatives calmly. In the field, a busy screen and changing light can make subtle contour spacing harder to read, so I prefer to have already formed a basic plan.
An everyday use case beyond hiking
Imagine planning a weekend visit to a viewpoint with two possible access roads. One is shorter on the map, while the other follows a longer curve around the hillside. With ordinary mapping, the shorter option may seem obvious. After enabling terrain detail, the direct road may reveal a concentrated climb, while the longer road maintains a more gradual rise.
That information can change the decision for a family car, a loaded touring bicycle, or someone walking with limited energy. It can also help when choosing a picnic location, campsite area, or meeting point where steep access would be inconvenient. The plugin does not need to provide a special outdoor itinerary to be useful; it improves the decision-making around places already visible in OsmAnd.
Another less obvious use is checking the character of a neighborhood before booking accommodation or planning a daily walk. A place may be close to a landmark in horizontal distance but sit on a steep slope. Contours can explain why a route that looks convenient on a street map might be tiring with luggage or unsuitable for a stroller.
Controls, permissions, and personal choice
From a trust perspective, I judge this add-on by what it visibly does: it adds terrain layers to the OsmAnd mapping experience. The clearest user control is whether I choose to use that layer while viewing the map. I can make a deliberate decision about when terrain information helps and when it only makes the screen harder to read.
I avoid claiming more about privacy or permissions than the product information establishes. A terrain overlay should not be treated as a promise about every aspect of the wider OsmAnd ecosystem. If privacy is important to you, review the permission prompts, account settings, and data choices shown on your own device before enabling related mapping functions. Those are the places where your actual choices matter.
The same caution applies to account expectations. This plugin is presented as part of OsmAnd’s map experience, so I would check how it appears in the app and what purchase or activation screen is shown before committing. The listed price is $38.99, making it a purchase I would consider carefully rather than an impulse download. I would first decide whether I regularly need elevation context, then compare that value with my existing use of OsmAnd.
The content rating is Everyone, which fits the nature of a terrain visualization tool. That rating says the feature is broadly suitable in content terms; it does not mean every route planned with it is appropriate for every person. A map can be accessible to everyone while the landscape itself remains physically demanding or hazardous.
Where the plugin is genuinely strong
The strongest benefit is the ability to see terrain relationships without leaving the map. I do not have to switch to a separate topographic reference every time I want to understand whether a route crosses a slope or follows a valley. That keeps planning in one place and makes comparisons faster.
It is also valuable for spotting misleadingly simple routes. Distance alone is a poor measure of effort, and contour spacing exposes that weakness. A route with fewer kilometers may involve a steep ascent, while a longer alternative may be more comfortable. This is a practical insight that a basic road map rarely communicates clearly.
Hillshade is especially helpful when I am unfamiliar with an area. Even before I study individual contour lines, the shaded relief can show the broad landscape pattern. I can identify a mountain flank, a depression, or a ridge system quickly, then use the contours to test my first impression.
The plugin also supports a more deliberate style of planning. Instead of choosing the first visible route, I can examine several options and ask what kind of terrain each one crosses. That is useful for people who care about exertion, accessibility, bicycle gearing, vehicle load, or simply avoiding unnecessary climbs.
Limits that affect real decisions
The first limitation is interpretation. Contour lines are not self-explanatory to every user, and a crowded display can be intimidating. If you have never used a topographic map, spend time learning what line spacing means before relying on it for a serious trip. A visually impressive map can still be misunderstood.
The second limitation is scale. At one zoom level, the lines may be too dense; at another, the broader terrain may hide small changes. I would not assume that a clean-looking display means the terrain is simple. Zooming in and out is necessary, and the result still represents elevation data rather than a complete description of the ground.
The third is that elevation does not equal route condition. Contours cannot tell me whether a path is muddy, blocked, exposed, poorly marked, crowded, or closed. They also do not automatically account for my fitness, weather, daylight, footwear, or the weight I am carrying. I still need current route information and sensible preparation.
There is also a cost consideration. At around thirty-nine dollars, this is not the kind of add-on I would recommend to someone who opens OsmAnd only for occasional city navigation. Its price makes more sense for a regular outdoor user who will repeatedly use terrain context during planning. If you only need elevation detail once or twice, another map source or a free reference may be better value.
How it compares with ordinary map alternatives
Standard road-focused map apps are usually better for quick driving searches, business information, traffic context, and familiar turn-by-turn journeys. They are simpler when the main question is how to reach an address. I would choose that kind of app when terrain is incidental and convenience is the priority.
A dedicated topographic map may be better for experienced hikers who want a broader collection of outdoor layers, specialized trail information, or a workflow built entirely around backcountry navigation. The advantage of the OsmAnd plugin is integration: if OsmAnd is already where I plan routes, the terrain view is available in the same mapping environment.
Paper topographic maps still have a place too. They do not depend on a phone display or battery, and they encourage a wide-area understanding of the landscape. The plugin is easier to update within a digital planning routine and can be inspected alongside digital routes, but I would not treat it as a reason to abandon basic navigation preparation for remote trips.
In other words, the best alternative depends on the question. For “where is the nearest address?”, use a conventional map. For “what does this entire backcountry area look like and what other specialist layers do I need?”, consider a dedicated outdoor mapping tool. For “which of these OsmAnd routes crosses the gentlest terrain?”, this plugin is much more directly relevant.
Who should pay attention to it
I think it is a strong fit for OsmAnd users who regularly walk, hike, cycle, tour by motorcycle, or plan drives through hilly regions. It is also useful for people who prefer to understand a destination before arriving, especially when a route’s physical difficulty matters as much as its distance.
It may suit travelers who want to avoid accidental steep approaches, outdoor educators explaining landforms, and photographers choosing viewpoints with a clearer idea of the surrounding relief. The benefit grows with repeated use: each trip gives the terrain layer another practical reason to be open.
I would skip it if your mapping needs are almost entirely urban, if you never compare routes by slope, or if you already have a topographic workflow that you find clearer and more complete. I would also hesitate if you expect the plugin to tell you whether a trail is safe or currently usable. That is beyond what contour lines and hillshade can establish.
Availability and overall value
The listing shows an average rating of 3.8 from roughly 2.2 thousand ratings, with over 100 thousand installs. Those figures suggest a real user base, but they do not tell me whether the plugin will match a particular person’s mapping habits. Terrain tools are naturally specialized, so personal usefulness matters more here than popularity alone.
It was released on December 22, 2012, and its long presence in the mapping space is reassuring in one limited sense: this is not presented as a brand-new experiment. Still, I would judge it by how well it fits my current OsmAnd workflow, how clearly I can read the layers, and whether I will use them often enough to justify the purchase.
My final view is cautious but positive. The plugin adds a genuinely useful layer of context to OsmAnd Maps, especially when a route’s slope and landform matter. I like it because it helps expose the difference between a short route and an easy route, which is exactly the kind of detail ordinary maps often hide.
My recommendation is to buy it only if elevation-aware planning is a regular need. Before relying on it outdoors, learn to read contour spacing, compare it with route information, and remember that terrain data cannot describe current trail conditions. For frequent hikers, cyclists, and landscape-minded travelers already committed to OsmAnd, it can make planning more informed. For casual navigation, the price and specialized purpose make it an unnecessary extra.
Pros
- Adds detailed contour lines for better hiking and terrain planning.
- Works offline once the required map data is downloaded.
- Integrates directly with OsmAnd’s map and navigation tools.
- Useful for assessing elevation changes before starting a route.
- Supports outdoor activities such as hiking
- cycling
- and mountaineering.
Cons
- Requires extra regional data downloads that use storage space.
- Contour detail and coverage can vary between different areas.
- May make the map display look crowded at higher zoom levels.
- Some features may depend on the OsmAnd version or subscription.
- Downloading large terrain files can take time on slower connections.
FAQs for Contour lines plugin — OsmAnd
What is the Contour lines plugin for OsmAnd?
The Contour lines plugin is an optional OsmAnd feature that adds terrain elevation information to the map. After installing the required contour-line data for a selected region, you can view lines connecting points of equal altitude and use them to understand hills, valleys, slopes, and mountain terrain. It is especially useful for hiking, trekking, cycling, ski touring, and other outdoor activities where elevation matters.
Does the plugin work without an internet connection?
Yes, contour lines can be used offline once the plugin and the relevant regional elevation data have been downloaded to your device. This makes the feature practical in remote areas with poor or unavailable mobile coverage. However, you need to prepare the map data in advance, and the download may require considerable storage space depending on the regions selected and the level of terrain detail available.
How do I activate contour lines in OsmAnd?
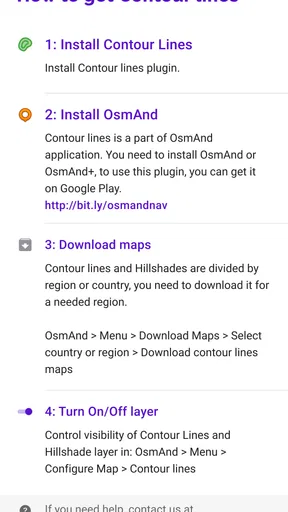
First, enable the Contour lines plugin from OsmAnd’s Plugins or Map settings, depending on the app version. You may then need to download terrain data for the required country or region. Once the data is installed, turn on the contour-line layer from the map configuration screen. The exact menu names can vary slightly between Android, iOS, and different OsmAnd releases.
Are contour lines free in OsmAnd?
Availability depends on the OsmAnd edition, platform, and current licensing model. In some versions, contour lines and terrain data may be connected with OsmAnd Pro or another paid feature package, while other installations may offer limited access or require an additional purchase. It is best to check the plugin page inside OsmAnd or the relevant Google Play and App Store listing before downloading.
How accurate and useful are the elevation lines for navigation?
Contour lines provide a valuable visual overview of terrain, but they should not be treated as a replacement for official trail information, survey equipment, or local safety advice. Their usefulness depends on the quality and resolution of the downloaded elevation data. Closely spaced lines usually indicate steeper slopes, while widely spaced lines suggest gentler ground. Always combine them with route conditions and weather information.


